It sounds harder and more intimidating then it looks. If you can replace a brake caliper you can do this easy. You need the following
10mm Flare wrench
12mm Socket
10mm Socket
9"s or so of extension for a 3/8s ratchet
1/4s ratchet
8mm wrench for the clutch slave bleeder
10mm wrench for the slave hard line
Big bottle of brake fluid
Catch Pan
#2 Phillips Screwdriver
Flat Head Screwdriver
Clutch Slave (Beck Arnely PN# 0729436 $37.79, RockAuto)
Clutch Master (Beck Arnley PN# 0729435 $58.79, RockAuto)
High Temp Grease
Pilers
And, most likely than not, you'll need to replace some of the fender bolt things. Its the one and only fastener you will probably end up breaking on this job. California is great when it comes to metal, but we make any and all plastics brittle like no other. Anyhoo on to the install
Master Replacement
First up, jack up the front drivers side of the car. If you look directly under the drivers side door hinge you'll notice a vertical extrusion about 1" high and 4" long. Thats your jack point.
DO NOT JACK ANYWHERE ELSE UNDERNEATH UNLESS IT IS ONE OF THOSE EXTRUSION POINTS, DAMAGE TO THE BODY PAN WILL OCCUR.
Secure the front of the car and remove the drivers side wheel. Once the wheel is removed, remove the wheel well guard. (I'll add more pictures once I remount mine). The guard is bolted to the body with a mix of screws and fender bolts. Try not to break the fender bolts cause they are expensive to replace.
Once the guard is removed you will have a clear shot of the master cylinder.
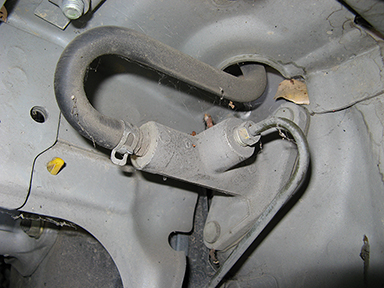
Using your pliers remove the hose clamp holding the reservoir to master line on, and disconnect the line. Be sure to have your catch pan handy to let the reservoir drain into. Next take your flare wrench and remove the hard line to the master. Some fluid may or may drain out on the hard line. Now head back inside the Insight.
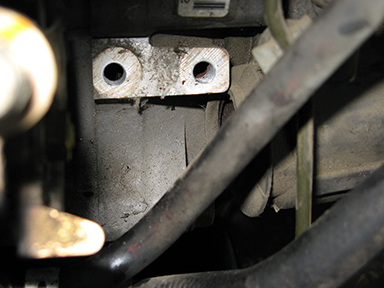
Looking up underneath the dash at the clutch pedal you should see this
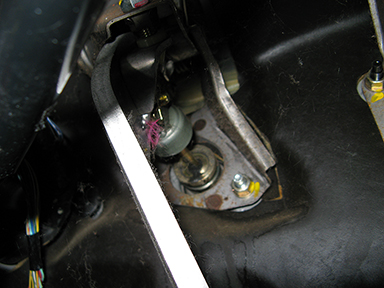
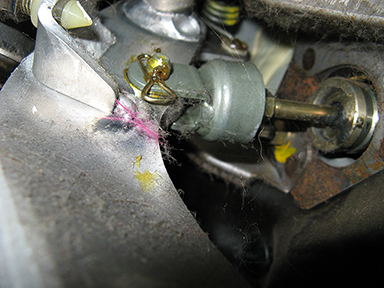
There are two bolts and a clip holding the master to the clutch pedal. You can use your fingers to remove the clip and the pin that holds the master to the pedal, and your 12mm socket to unbolt the master. Once unbolted you can head back outside and just pull the master out. There is a rubber gasket on the old master that you want to reuse. Be sure to swap the gasket over to the new master before you install it.
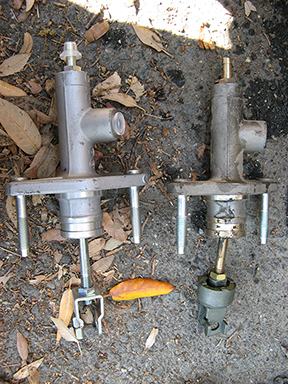
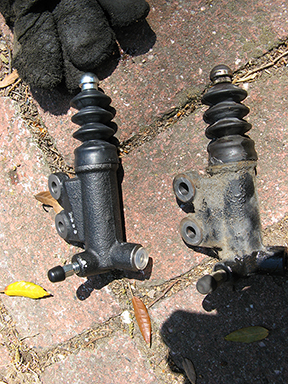
New vs old
Installation is the reverse of removal. Be sure to grease the pin that connects the pedal to the master. End result

Slave Replacement
Replacing the slave sucks due to the lack of available room to work in. But its still pretty simple. First remove the air box intake tract that runs along the front of the engine. You just need to remove the tube, the rest can stay. Once removed, you want to remove the throttle body cover. The bolt is a 10mm. Once removed you should be able to see the slave (missing pic)
Now due to the lack of room and the size of a flare wrench you don't really have the space to use it there. So in this situation, the only way to get the hard line off would be to use a regular 10mm wrench. Just be careful cause you don't want to round off the head of the hard line. Once the hard line is removed, remove the two 12mm bolts holding the slave to the tranny. With a couple of twists and turns it should pop out without a problem.
Inside that rubber boot on the right, seen in the last picture, is where the clutch release fork lives. The slave has a rod that pushes against this fork to release or engage the clutch. If you stick your finger inside the boot you can feel the depression that the slave rod pushes against. What you want to do is take some grease and lube the depression. This allows the rod to smoothly pivot against the fork. Installation is the reverse of removal, but a few things to keep in mind. The slave release rod rides inside the boot on the slave, its not really plugged into anything, its an extension more than anything else. So when you reinstall the slave it might move and try to relocate itself. I found that its best to let it flop a bit when you are initially repositioning the slave, then you can realign the rod and bolt everything together. Its best when reinstalling to stand over the drivers side fender cause it gives you added leverage against the slave wanting to push itself out of the hole.
Once all that is done, but sure to bleed the lines in your preferred method and enjoy a now way more responsive clutch action.
Leave a Reply